-
The clock is ticking, Growing Trends will be on air soon

You have to hand it to the Swiss, they make incredible clocks, this one was seen in Geneva a few years ago.
Error: Contact form not found.
Views: 32
-
A walk around a garden can be very therapeutic.
I received an email from a client today, it was most thought provoking, all about the therapeutic effects of a well thought out landscape, in her case an ancient woodland area.
I’ve been designing and building some amazing landscapes since graduating way back in 1975.
Sometimes when we finished a project the garden took on it’s own aura – one a Chelsea Flower Show exhibit literally changed colour and became this amazing golden yellow, you could almost feel the colour ( if that’s possible)
I’m in the business of creating dreams for people – if we manage to design well the garden does indeed make folks feel happy and at peace. More often than not we tend to energise folks into taking more time to enjoy what we have created.
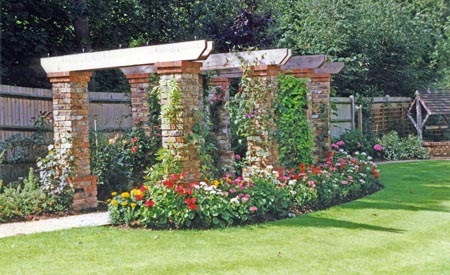
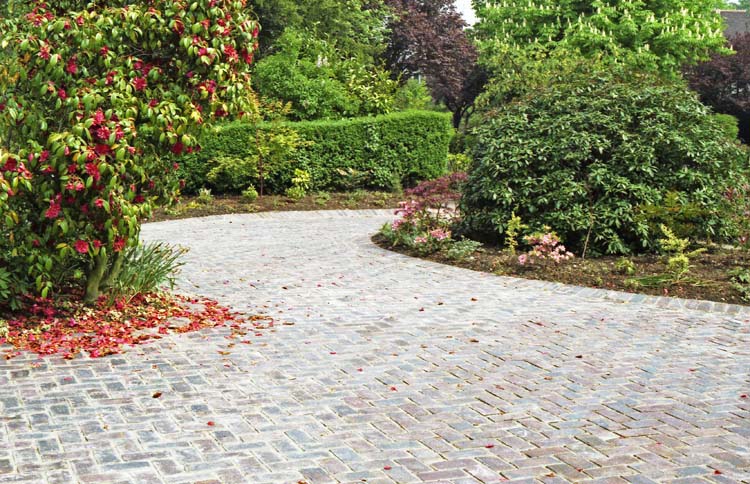
One of our favourite additions is a path around the garden, it needs to be wide enough for two to walk side by side so about 5ft wide is ideal, in this way the enjoyment of the garden becomes a journey with a destination as well as a practical gardening use.
In this case we added a pergola for a little shade as you walk, as well as a focal point from the terrace, in the distance you can also make out a well feature, so the path has various destinations as you walk around.

It’s also a good idea to create a firm edge to a path, to prevent it from migrating into the landscape, the path itself is made with a sub base of limestone and a dressing of finer binding gravel to act as a wearing surface – requiring a little weeding and a rake & roll every two months.
Always set the lawn level about 1/2inch (15mm) to an inch(25mm) above the path edge, in this way you can clean cut the lawn with just the mower, and those dreadful strimmers can be left in the truck !

You can hear more about our techniques, ideas, views of experts, interviews with home owners with beautiful gardens on our new radio show called Growing Trends – you can find us a www.growingtrends.org
Views: 122
-
How to start a project from a designer’s perspective.

It’s been many years since I first visited a client to sell my design & build company to them.
In all these years , some things never change and first impressions are always top most in my mind. Fortunately with many years of experience, a huge portfolio, a large portfolio of awards, and dozens and dozens of personal recommendations, it’s a little easier. However one should always remember “You are only as good as your last job” !
My system for want of a better word starts with my secretary, she will engage the potential client, take down details of why they called what they would like and, then make an appointment she knows I can keep – missed appointments or forgotten phone calls are extremely rude and guaranteed to lose you a project.
Because like most males (I suspect), my navigations skills are not particularly good, when she creates a temporary file it includes site directions, phone contacts etc.,
It also includes our questionnaire. We developed this as a means to extract information vital in providing what the customer was really seeking at the price they were willing to pay so that we could “Under promise and over supply” ..
During the initial visit, I will, listen about twice as much as talk, ( for those of you who know me well, this is a very interesting concept) discuss likes and dislikes, make a few notes, walk around the property and take site pictures, as it is usually the lady of the house only during the day, the site questionnaire is left to be completed, along with a fees for design work – I have never not charged for design work ( we may give part back on acceptance of the project), but we have worked on the principal that if you do not pay for something you do not value it !
Nothing is free in this world, and hiding your design costs inside the work is no exception, we are in business to provide an exceptional service at a fair price, that enables us to pay our staff, maintain insurances, replace equipment etc.,etc., finding the right balance is always a challenge.
Whilst walking around the site, it’s a great idea to make notes of access, height restrictions, positions of services, gate widths etc.
This initial visit would usually take about an hour perhaps a little longer, and often the acceptance rate to stage two the design would be around 55%.
Sometimes folks just wanted our award winning design skills, and that was fine as long as they paid the true price for them.
So here is the questionanaire.
Brief description of what you are looking
for : …………………………………………
………………………………………………………………………
………………………………………………………………………
……………………………………………………………………….
………………………………………………………………………
………………………………………………………..
How you use your garden :
Do you have animals ? : Yes / No.Do children play in the garden ? : Yes / No.
Do you like gardening ? : Yes / No.Do you like cutting grass ? : Yes / No
Do you entertain in the garden ? : Yes / No.Do you like relaxing in the garden ?Yes/ No.
What sort of Budget you would like us to Design
to : ……………………………………………………
(It helps enormously if we can have a figure to
work to, we should be able to produce a Design
within 10 percent )
Some items to consider :
Lawns. Yes / No
Shrubberies Yes / No.
Rockeries Yes / NoPonds Yes / No.
Streams Yes / NoFish / Koi Ponds Yes / No.
Paths Yes / NoPatios Yes / No.
Terraces Yes / No.Walls Yes / No.
Ground contouring Yes / NoVegetable gardens Yes / No.
Garden Features :
Garden Shed : Yes / No.Power & Lighting Yes / No.
Irrigation Yes / No.Summerhouses Yes / No.
Greenhouses Yes / NoGazebo’s Yes / No.
Pergolas Yes / NoSeating Yes / No.
Please add any other comments on the back of this sheet,
the more we know the better the design.We also suggested that a likes and dislikes list was created so we knew what to add or avoid.
Finally, rather than try and describe the items or styles we suggested that clients either take pictures, or articles from a magazine or bookmark web pages. so we could begin to build a profile picture of the type of landscape they sort.
We can go into this in more detail on our radio show at Growing Trends on www.cravingtalkradio.com

Views: 38
-
School ‘themed’ garden

One of my favorite projects is a themed garden for a Primary School in
South London.
The idea was to create a ‘dry’ replica of a Kentish Riverside,
on what was a tarmac car park.
We achieved this by starting with a ‘dry’ riverbed of kidney stones
laid in a flowing pattern, with ceramic fish set into them.
Next we designed and built a miniature Oast house, and
a Kentish Barn.To comply with disability access requirements we added a
jetty to the dock.
Then constructed three mock sailing boats using trees as masts( to facilitate shade in the Summer months).
We also added a typical stone bridge, a gravel path around the
garden area, and a fallen tree ( depicting the great storm of 1987).

Here you can see the ceramic fish set into the dry stone riverbed.

Here you can just make out the natural stone bridge.
The idea was to use all local materials so that whilst the ‘garden’
was created to be a quiet rest area during breaks it also had
some educational historical significance.

We took a little ‘licence’ with the barn, but kept the materials authentic.
When it came to planting, we arranged for each child to plant at least one plant,
some plants ended up being planted more than once.The end result won a number of awards, and was remarkably free from any vandalism.

Views: 40
-
Ground Preparation

It seems that Spring or is it Summer has finally arrived to the MidWest ?
It’s at times like these when one misses being in England with it’s very much milder climate, although their winter was a tad wetter than normal ( I hear wetter than the past 200 years !).
So back to the MidWest, the bunnies are hopping around, the snakes are emerging, grass has turned green, buds are bursting and flowers are appearing, hardy folks are out and about in their yards, starting to tend the vegetable gardens in ernest.
With that in mind I thought it might be an idea to talk a little about the various methods to use to prepare ground for planting.
Easy Way :
The easiest way to prepare ground is to first cut down any vegetation to as close to the ground as possible – rotary lawn mowers are good for this, so long as you have walked over the ground and removed any large stones, branches or other debris, it also helps if the found is reasonable flat.
Next all that you need to do is to cover the area to plant in a thick coating of newspapers, then cover these with reusable landscape fabric and secure in place.
It takes about 4 – 6 weeks to clear all the growth beneath, but when you do lift off the landscape fabric ( carefully as you can keep this for future use) and then removed the newspaper you should find bare soil beneath. Simply replace the landscape fabric and plant through this to complete you project.
Harder Method :
Cut down the growth on the area – usually with a rotary lawn mower ( do check for objects first).
Now for the fun part, stripping off the growth, this can be a strenuous operation if you use say a spade to ‘chip’ the grass and weeds off, alternatively you can use a rototiller and take a quick romp across the hard ground until a fine tilth is established, of course you have just spread a kazillion weed seeds as you do this. If the ground really is ‘too hard’ it helps to soak the area with water the day before.
Now all you need to do is to rake to an even level – do make sure that the ground slopes away from buildings, as when it rains you don’t want the ground to become waterlogged or allow water to accumulate near walls or on paths etc.,
Finally you can place and secure the landscape fabric, and complete the planting of your project.

Planting :
The planting technique is basically the same for both techniques :-
- Water thoroughly all plants to be planted.
-
Keep plants in shady position until planting.
-
Cut a 6 inch ‘x’ in the landscape fabric in the desired planting position
-
Dig a hole approximately 50% larger all-round than the plant pot.
-
Keep this soil nearby.
-
Add a small amount of planting compost to the base of the pit, together with fertilizer and if you have it a corn based super absorbent.
-
Mix these materials together and add some water until you have a ‘porridge’ or as ‘she’ who must be obeyed would say a ‘mud pie’
-
Select plant, tap edge of container to facilitate removal of pot, and carefully place in pit.
-
Carefully backfill soil around plant and firm into position.
-
Fold back landscape fabric carefully to the stem of the plant.
-
Apply approximately 2-3 inches of mulch ( keep at least 2 inches away from plant stems)
-
Water thoroughly, and again every other day for the first two weeks.
Views: 76
-
We’re ready to record our radio show..!

We would really like to hear what you think about our program, and to ask you what you would like to hear on the show, or even be interviewed about any of the topics we are planning to present.
Here’s a typical weeks content:
The show is intended for the homeowner, with input from homeowners & experts around the world.
Discussing Edibles, Vegetables and Herbs, what are the easiest to start with, where & how should I grow them.
An interview with a homeowner that grows veggies and herbs interspersed within flower borders – growing peppers, rosemary, parsley, beans,cabbage, lettuces, tomatoes, etc., are quite easy,
Amusing anecdotes from some 40 years of landscaping gardens & commercial sites across the globe.
Interviewing a small organic vegetable farmer in the MidWest, what they are growing ,how they get to market…
Around the world trends in growing vegetables & herbs from our colleagues abroad, looking at for example – Allotments in England, Balcony raised beds in Europe,

The next week will be:
Choosing the right plant – how to plant, prune, and maintain flower beds and plant containers.
Interviewing a sustainable garden designer in the USA – how to save water, prepare ground, aftercare, etc.,
More anecdotes from around the globe.
Trends in Playgrounds, Roof Gardens, Paving, Parks, Grass areas from around the world..
If you have a question you would like ask, please send us an email with the question we will try and answer questions each week, we may even call you ! We will also send you details of where you can hear the program.
As the program will be on internet radio, it will be possible to record directly from the web, enabling you to play back when its best for you.
Error: Contact form not found.
Views: 42